Awards Categories and Questions
Categories and questions form the basis for the Awards entry system.
It is imperative that categories and questions are tested before going live using test mode, paying particular attention to the question types selected.
Certain elements cannot be changed once an entry has been received so it is import to test prior to going live.
In this article
Category Groups
Category groups are an optional way to organise your categories in the admin portal, as well as to present your categories by group on your website
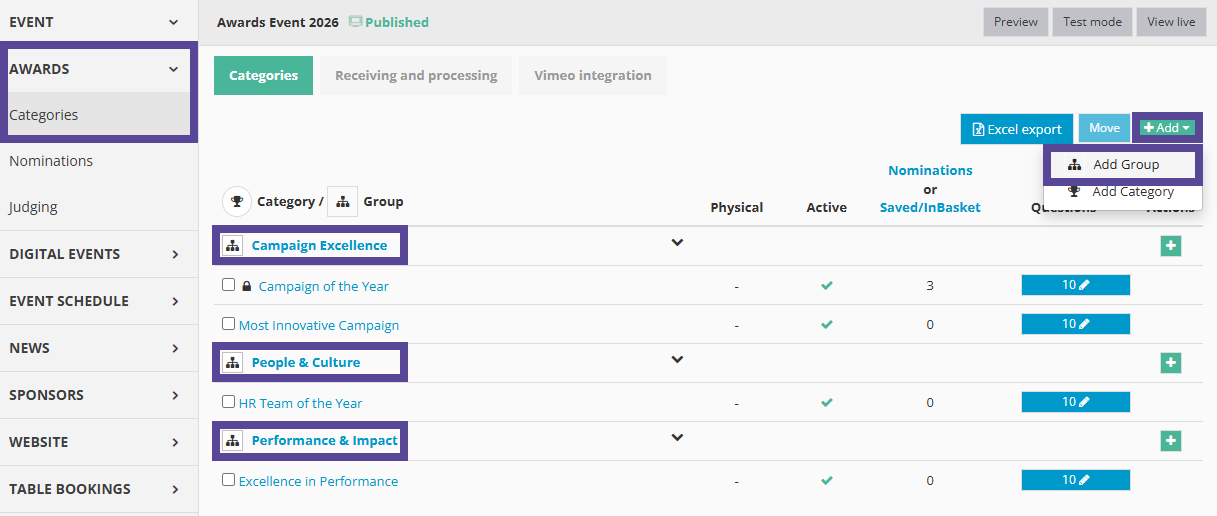
To create a Category Group, go to Awards > Categories.
Click the green +Add button, then select Add Group.
In the window, add the category group a name and add an optional description.
Note 🗒️
If you add a description, this will be displayed if you choose to display your categories in their groups on your site.
When you are done, click Save.
Creating Categories
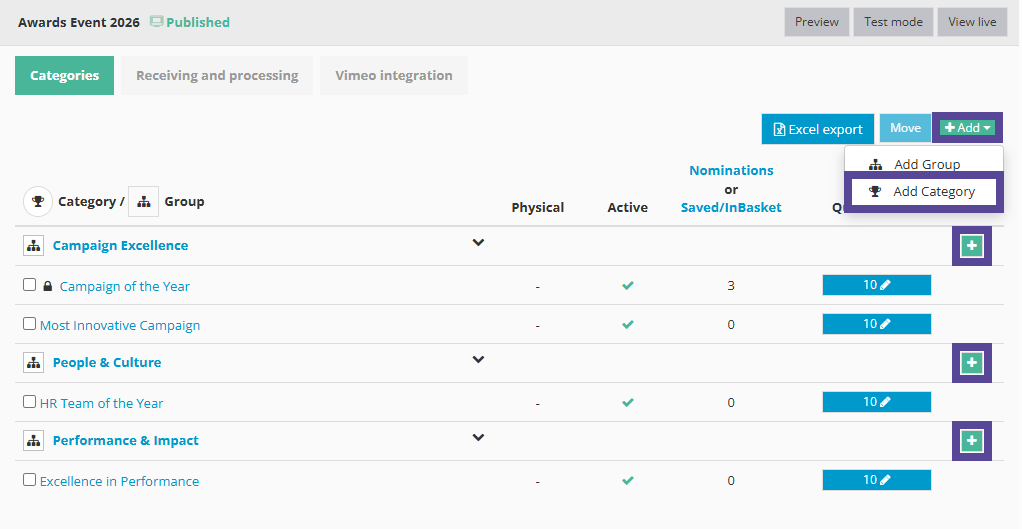
To create a new category, go to Awards > Categories.
To add a category to a category group, click the green ➕ sign beside the group you want your category to be in.
If you are not using category groups, or wish to add your new category outside of a group, click the green +Add button, then select Add Category.
In the new window, select the category type.
| General | Select this option if the category does not apply to either a person or an organisation e.g. product of the year. |
| Person | The category entrant will be an individual person. The system will automatically include the questions first name, last name and email address and these will be required fields. |
| Organisation | The category entrant will be an organisation. The system will automatically include the questions organisation name and domain. These will be required fields. |
Give the category a name and add the category description.
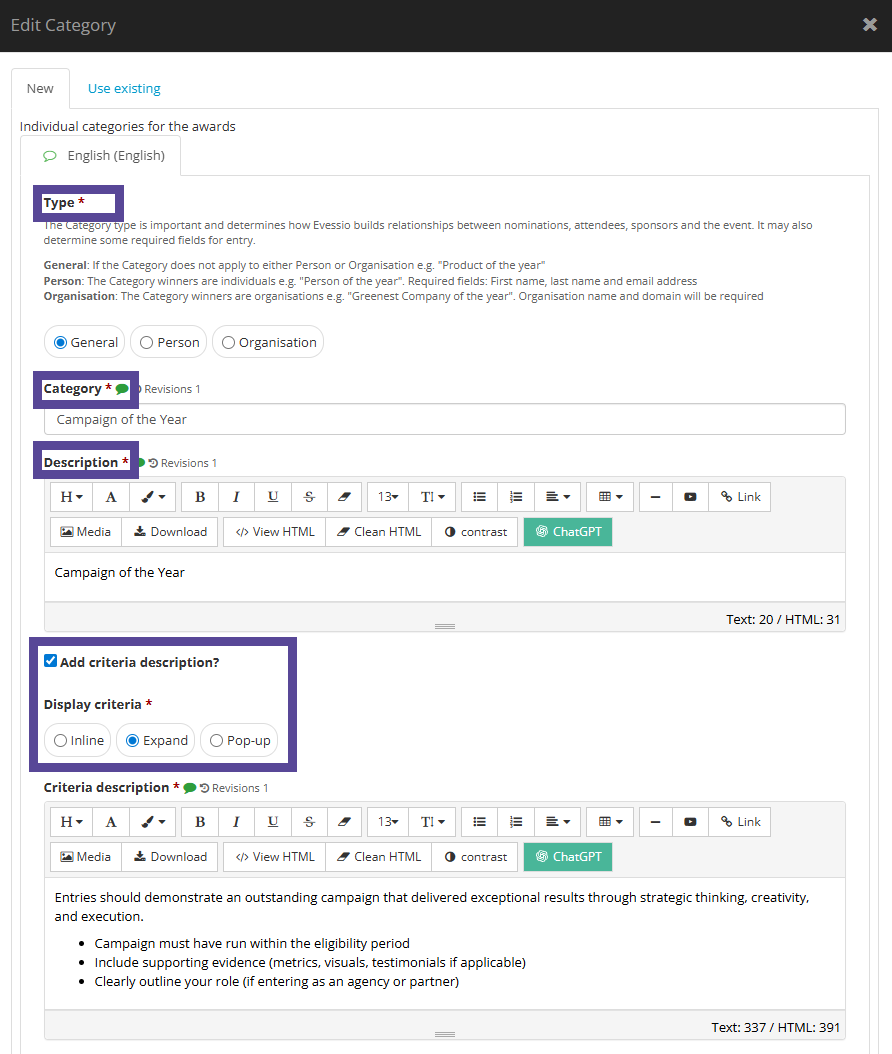
If you have additional criteria you would like to include, you can optionally add a criteria description.
Select the checkbox Add Criteria Description? to activate this option.
Then, select if you would like the criteria description to appear in line (i.e. on the page by default), or either in an expandable section or in a pop up window, both triggered by clicking a View Criteria button.
Next, you can add an optional description of your pricing, i.e. information about discount codes or promotional rates.
Note 🗒️
If your entries are paid-to-enter, the price and other transaction details are added in Revenue > Products > Awards Nominations. For more information on adding pricing, click here.
The button on your website to add a category to the basket will say Enter now by default. If you would prefer it to say something else, add your preferred wording in the Button text field.
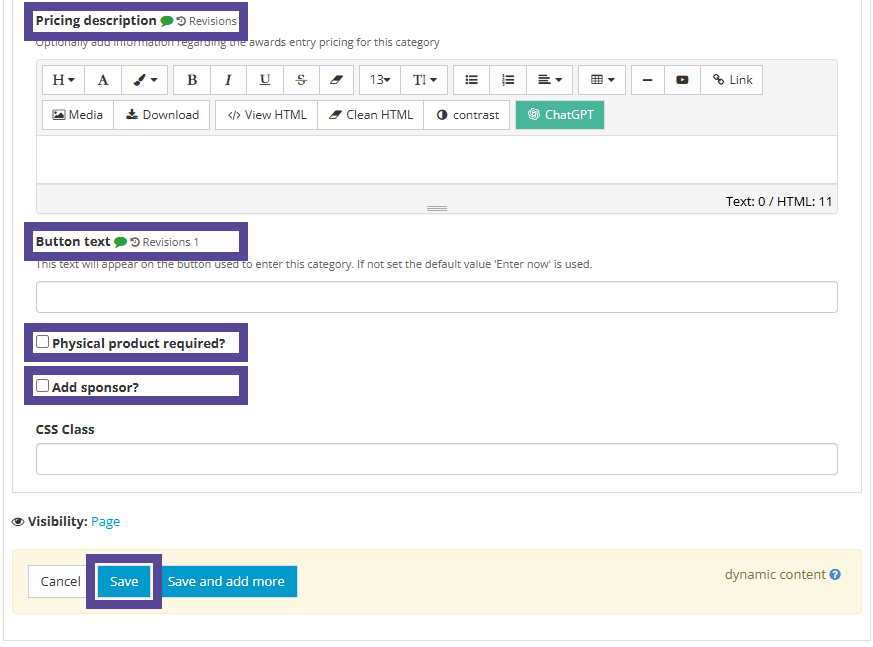
If you require the submission of physical product(s), tick the option Physical product required?. This will enable you to add Shipping Instructions and address, and configure your category to manage the receipt of the physical product.
Note 🗒️
For more information regarding receiving physical products as part of an entry process, click here.
Finally, you can add a sponsor to your category by ticking the option Add sponsor?.
If the sponsor has already been created within your event, simply open the area labelled Re-use other Sponsor Profiles, and select the relevant sponsor.
You can create a new sponsor by clicking +New Sponsor Profile. (you may need to save the category and re enter to activate this button).
Note 🗒️
To learn more about creating sponsors, click here.
When you are ready, click Save.
Adding questions to your categories
Once your categories have been created, you then need to create the questions that will make up the entry form. To access the list of questions, click on the +Add questions button on the right side of the screen.
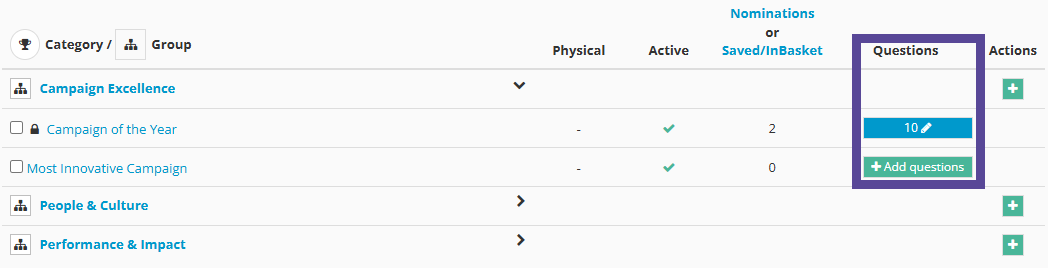
Tip 💡
If you have already added questions, you will see a blue box with the number of questions listed. To add more questions, click on this blue box.
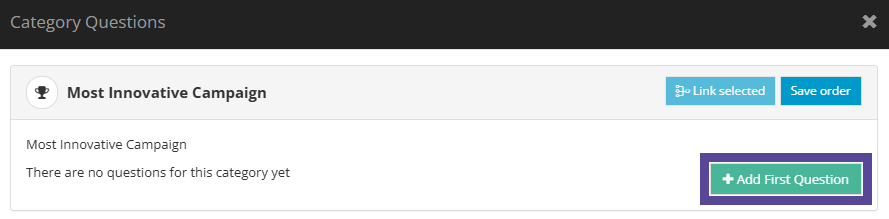
In the new window, click +Add First Question.
First, input the question in the Question field and select an Answer Type.
The answer type you choose will determine what information the entrant can provide.
The default answer type is Textbox- single line field, and you can choose to change this depending on the information you are expecting to receive from your entrant.
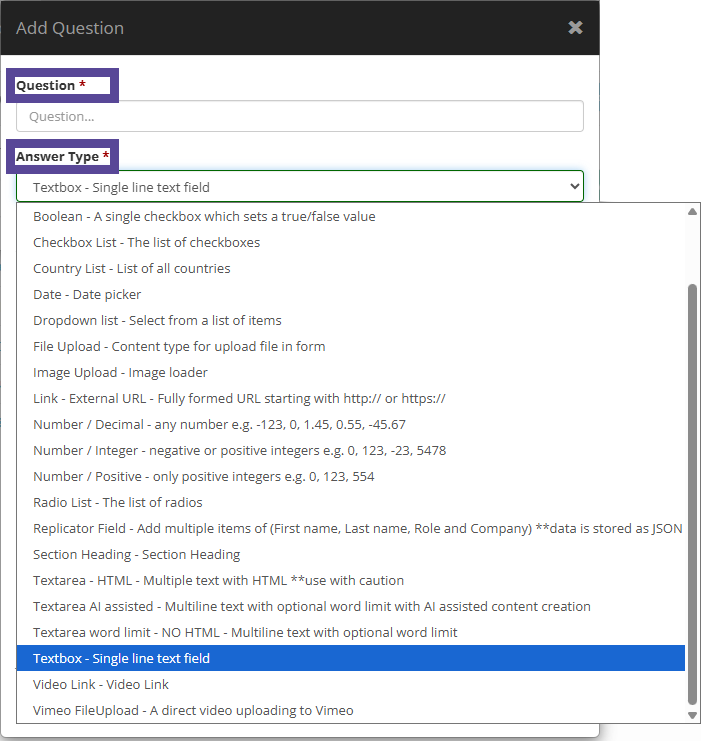
There are a variety of answer types for you to choose from, including checkbox lists, radio lists, text fields with an optional word limit, date pickers, file and image uploaders, and video link fields.
If you add the question called Person, this includes first name, last name and email address.
If you add the question called Organisation, this includes organisation name and domain.
Tip 💡
File upload fields are for single files, and have an upload limit of 40mb.
If you require entrants to provide multiple files or images, ensure you add multiple file upload questions.
If you require users to provide a video you should select the video link field. Entrants should upload their video to Youtube, Vimeo or TikTok and provide the URL in the video link field. The videos cannot be private but they can be unlisted.
Note 🗒️
For more information about accepting video entries, click here.
Then, choose if the answer your entrant provides to this question will be used as for the nomination name.
You can select multiple questions to be used as the nomination name.
It is important you choose at least one field otherwise every entry will say -not set-.
Note 🗒️
For more information about nomination names, click here.
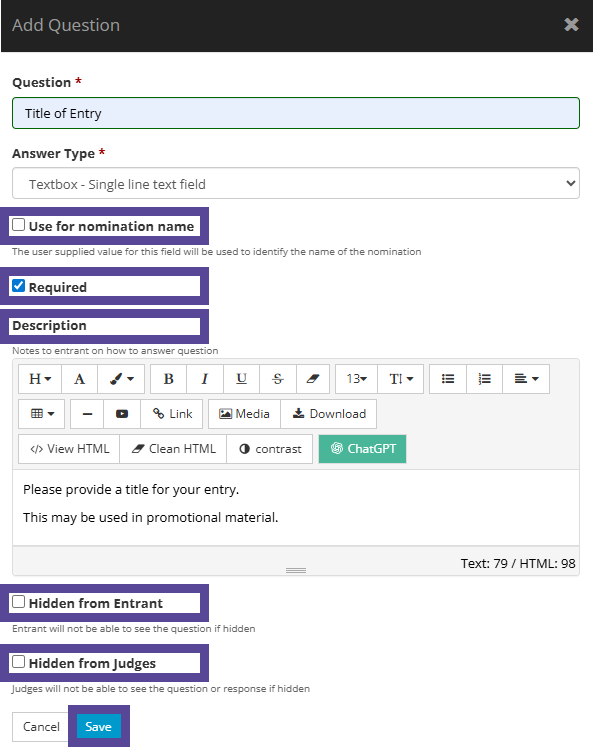
Then, choose if this question will be mandatory or not by ticking the Required option.
Next, add an optional description.
This can be any additional information or notes about the question you would like to give the entrant, e.g. format and dimensions when requesting a logo image upload.
Finally, choose if this question should be hidden from entrants or judges.
Note 🗒️
For more information about hiding questions from entrant or judges, click here.
When you are done, click Save.
Repeat these steps until all questions are added.
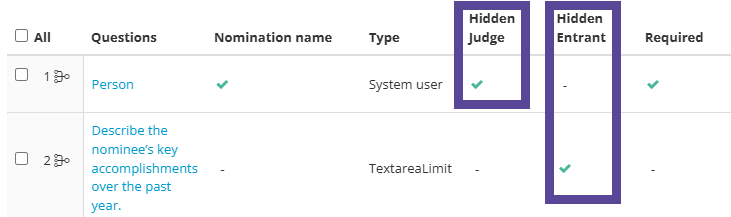
Hiding questions from Entrants or Judges
You can choose if questions should be Hidden from Entrant or Hidden from Judges.

If you select Hidden from Entrant, the question will not appear on entry forms. This is a good option when you want to remove a question that has already received responses and therefore cannot be deleted, or if you want to reveal certain questions only at a specific time.
If you select Hidden from Judges, the question will not appear for judges when they are viewing entries on the judging portal.
This is a good option if you want to collect data from your entrants such as phone number, address, or marketing opt in, but are not relevant to the judging process and do not need to be viewed by your judges.
Once your chosen items have been hidden from either entrants or judges, this configuration is easily visible from the list of questions.
Reordering your questions
Once you have created your questions, the order they are listed is the same order they will be seen by entrants.
If you want to change the order, simply drag and drop the question to your preferred position.
Once you have chosen your new order, scroll to the top of the window and click Save Order.
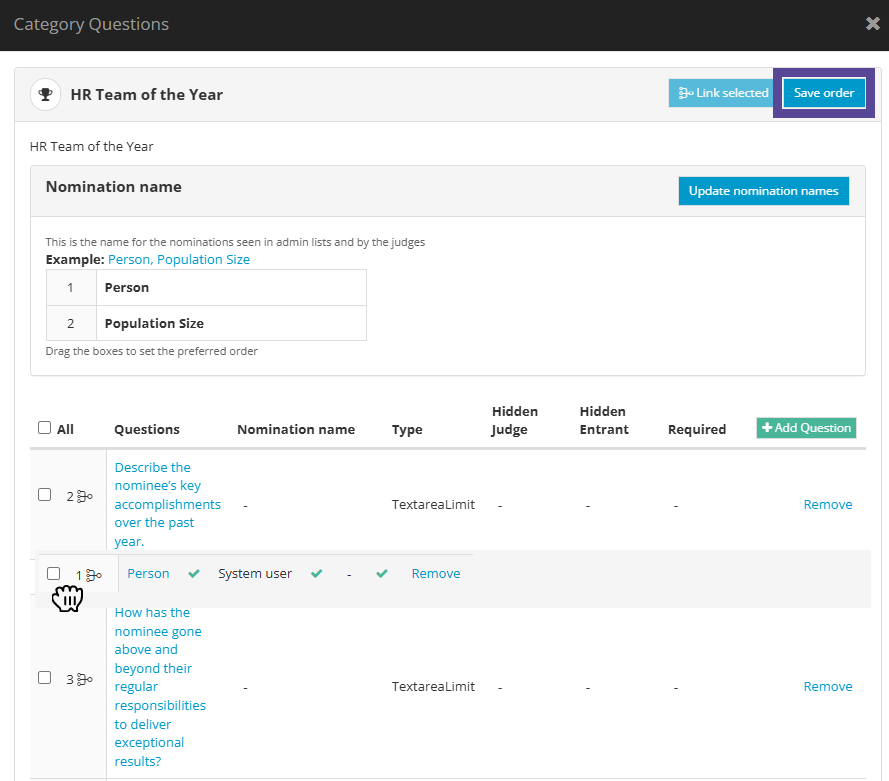
Warning ⚠
If you do not click Save Order, your questions will revert to the order they were originally in.
Sharing questions across categories
Once you have created your questions, you can then share these to other categories.
This will allow you to link or copy questions to to other categories, without having to remake your questions from scratch.
Note 🗒️
For more information about sharing questions across categories, click here.