
Mailshots: Filters
Once you have designed your mailshot and begun creating your recipient list, you then need to use Filters to determine your Dynamic List recipients.
In this article
System Filters
Evessio provides a list of system filters with a description of which users and actions will be included.
The system filters listed are:
| Filter Name | Description |
| Role All Registered | All people who have created an account or are a returning user for the event |
| Role Judges | All collaborators with the role of Judge |
| Role: Sponsor | All collaborators with the role of Sponsor |
| Role: Table Booking Customers | Users who have purchased Table Booking products |
| TX: Incompletes | Users with Incomplete transactions |
| TX: Users with Baskets or Saved and No previous transaction | Users with items in saved or baskets who have not made any previous transactions |
| TX: Users with Baskets or Saved and previous transactions | Users with items in saved or baskets who have made at least 1 previous transaction |
To choose a system filter click the drop down menu next to Filter by criteria

System filters need to be cloned as you will not be able to edit them directly.
Click here to see how to edit filters.
Custom Filters
To create a custom filter, you can either choose an existing filter and edit or clone it, please see the Edit Filter section below.
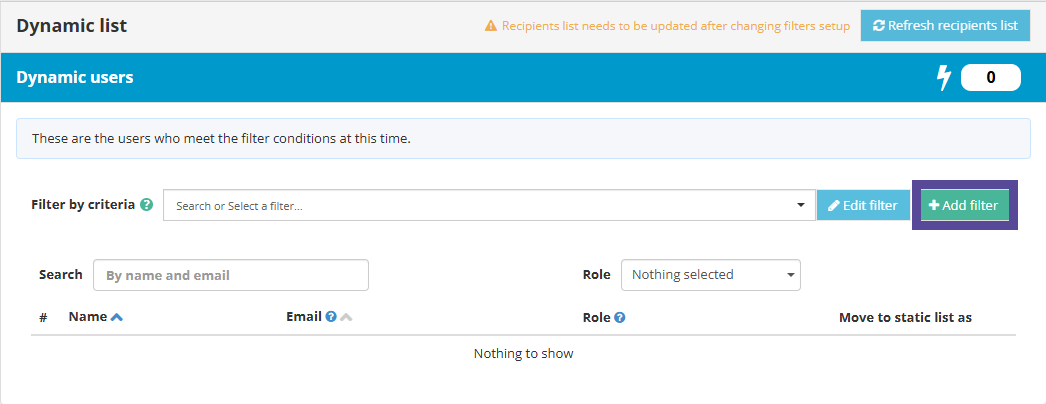
Or if you would like to create a new filter, then click on the Green +Add Filter button to the right.
Note 🗒️
When you create a new filter it will be saved and accessible to use on other events in your organization.
Name the filter and give it a description, both fields are required.
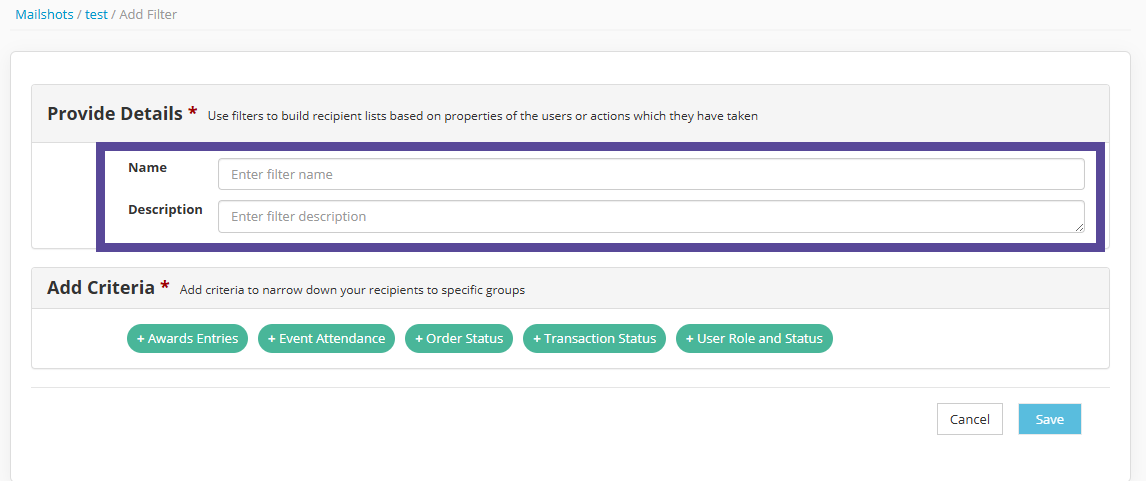
There are 5 potential criteria options: Award Entries, Event Attendance, Order Status, Transaction Status and User Role and Status.
Warning ⚠
The criteria options are themselves dynamic meaning they are aware of the event configuration you have set up.
For example if you do not have the Award Nominations set up then you will have no Award entries criteria. If you do not have Event Attendance set up then you will have no Event Attendance criteria.
The same appIies for some filters such as the check in status, if the Event Attendance Check-in module is off then the filter will not be present.
Award Entries Criteria
The Award Entries criteria allows you to target Nominee/Nomination Customers through out the awards process, from Entry through to Judging.
You have two main stages to choose from; Entry Stage or Judging Rounds.
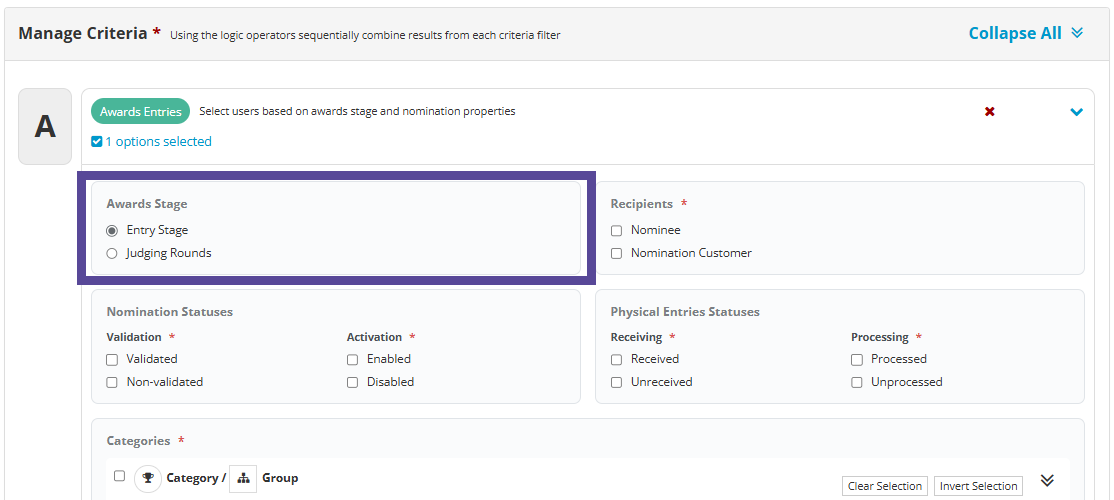
Entry Stage
Select the checkboxes which you would like to filter for your target list.
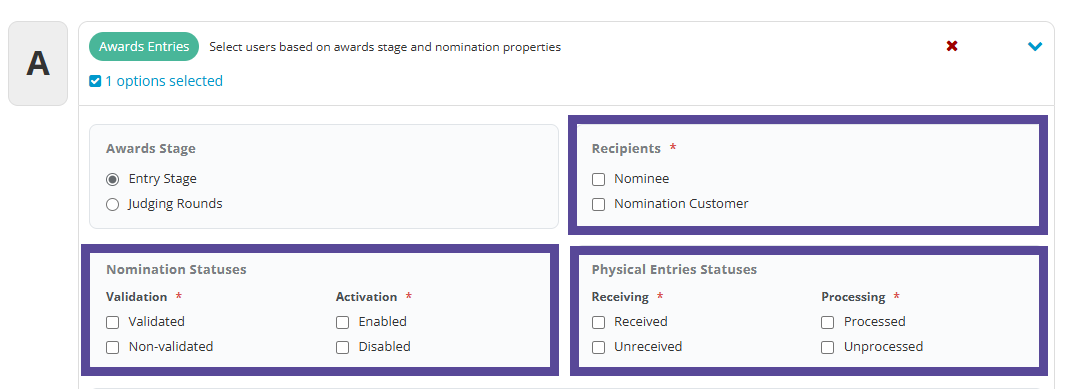
Recipients refer to the users role. read more
| Recipients | Description |
| Nominee | Person named in an Awards Nomination |
| Nomination Customer | Person who purchases an Awards Nomination Product (Nominator/Entrant) |
Nomination Statuses refer to the validation steps you have taken in the Nomination process. Via the Nominations tab you are able to run through your nominations and mark them as validated or you can mark nominations as Disabled. This filter gives you the ability to target either one of these options.
| Nomination Statuses | Description |
| Validation | Choose between Validated or Non-Validated |
| Activation | Choose between Enabled or Disabled |
Physical Entries Statuses refer to nomination receiving, When running awards where category submissions require physical entries e.g. food, drink or product awards, Evessio allows you to easily coordinate the receipt of physical entries in a number of key ways. Read more
| Physical Entries Statuses | Description |
| Receiving | Choose between Received and unreceived |
| Processed | Choose between Processed and Unprocessed |
Judge Rounds
When Judge round is selected, you are targeting recipients from a specific Judge round(s). You are able to check multiple judging rounds if you wish.
Under Awards Stage, click the Judging Rounds checkbox
Next click the dropdown menu to choose your Judging round(s)
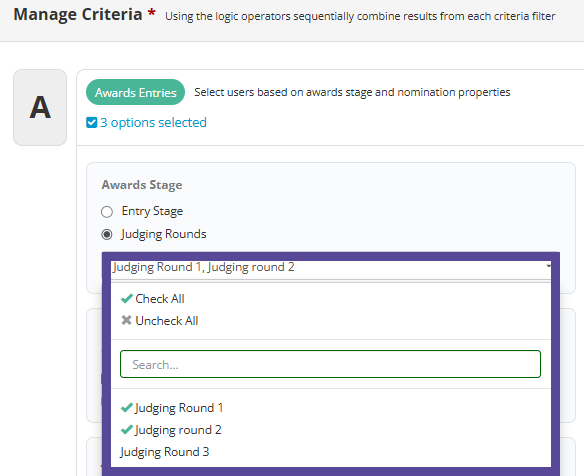
Once you have selected the Judging rounds option under the Awards Stage, additional sections will be displayed as well as the Recipients and Nomination Statuses you had before. You will be able to filter based on the results of the judging round, such as rank, score, or if the entry has been shortlisted or classed as a winner.
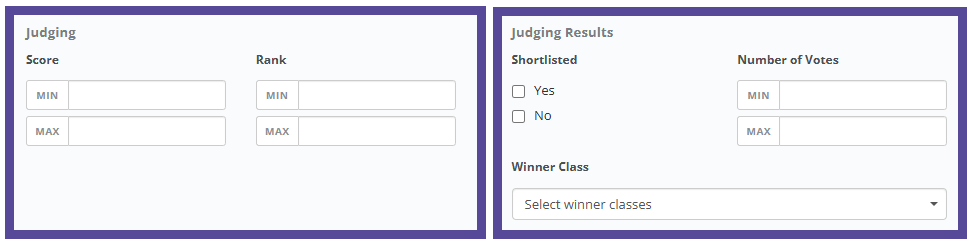
Judging Target recipients based on the score or rank they received during the judging round.
| Judging | Description |
| Score | If you would like to filter your recipients based on the scoring they received in your judging round, set the min and max scores. |
| Rank | If you would like to filter your recipients based on the ranking in which they are ordered in your judging round then add the min and max numbers. |
Judging Results Target recipients based on results of the judging round.
| Judging Results | Description |
| Shortlisted | If you would like to filter only recipients who have been marked as Shortlisted in your judging round then check Yes. Choose No for the opposite results. |
| Number of votes | If you would like to filter your recipients based on the amount of votes they received in your judging round, then set a min and max number. |
| Winner Class |
If you would like to filter only recipients who have been marked as Winners in your judging round then check Yes. Choose No for the opposite results. If you are using a Winner class you can click the dropdown menu and choose the class you wish to target. |
Targeting the Categories
Once you have set your Award Entries criteria for either Entry or Judging stages you then have the option to select individual categories or all categories, by checking the check boxes to the left side.
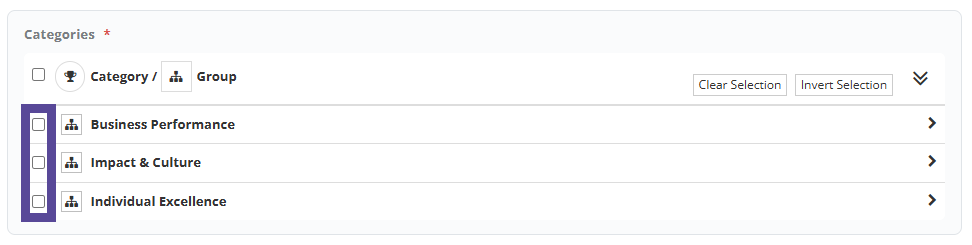
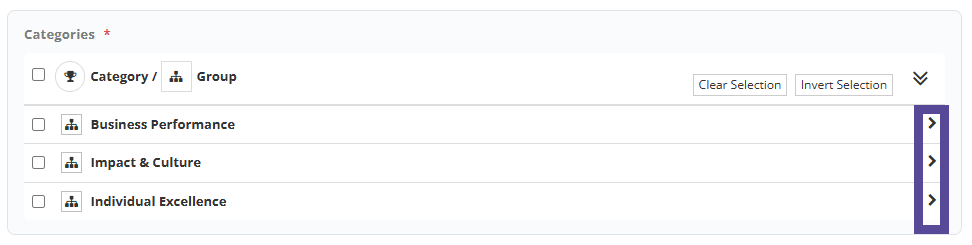
If your categories have groups it will list them grouped, you can click the black arrow to the right side per group to open them and choose individual categories to check.
Once you are happy with your criteria click Save at the bottom of the screen. It will now be stored in the filters dropdown menu where it can be used for future Mailshots.
Judge Activity Criteria
The Judge Activity criteria allows you to target Judges based on the progress they have made in a judging round.
First you need to select the Judging rounds. You can only select up to 2 rounds per recipient list.
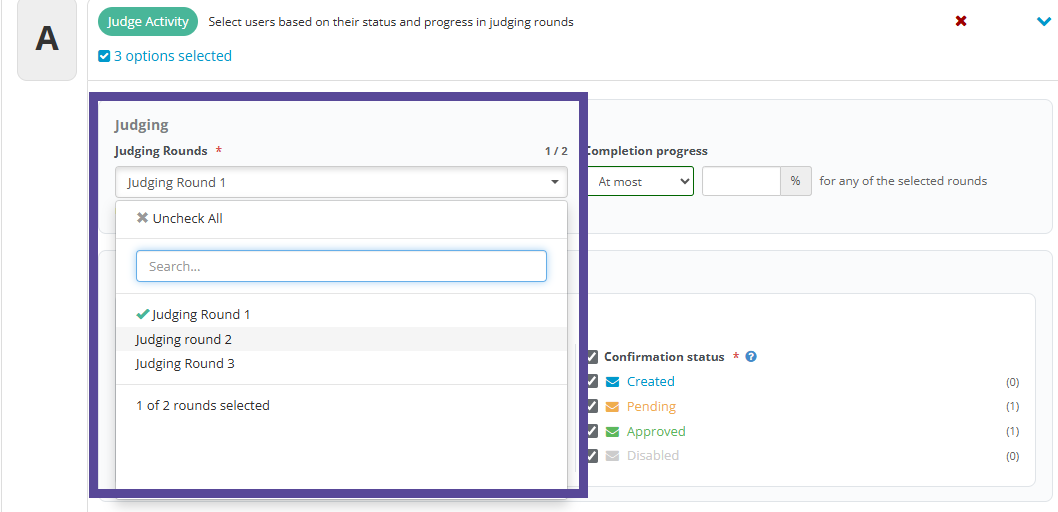
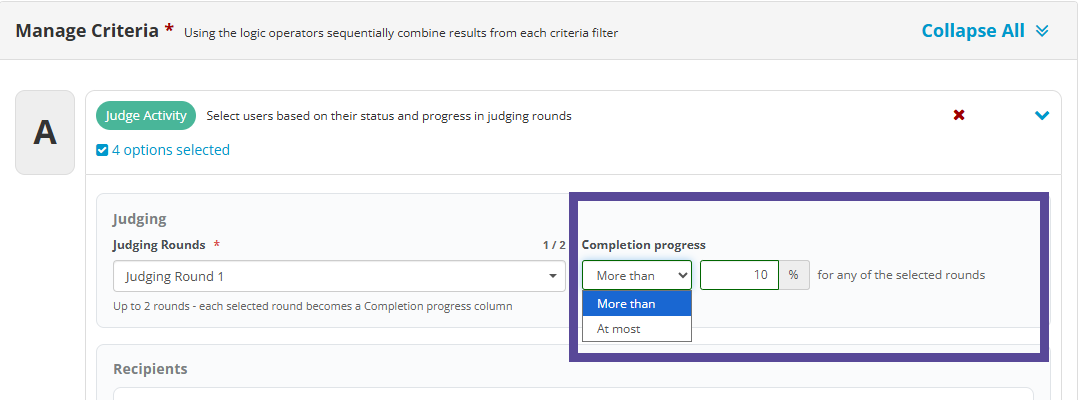
Next you can choose the completion progress. the two options available are At most and More than, choose one then enter a percentage.
Use Completion progress to apply the rule based on how much of the selected rounds has been completed.
- More than – applies when completion progress is above the percentage entered. The specified percentage is not included.
- At most – applies when completion progress is equal to or below the percentage entered.
For example, if you enter 10%:
- More than 10% applies only when progress exceeds 10%.
- At most 10% applies when progress is 10% or lower.
These options ensure the specified percentage is included in one condition only, with no overlap or gap between the two ranges.
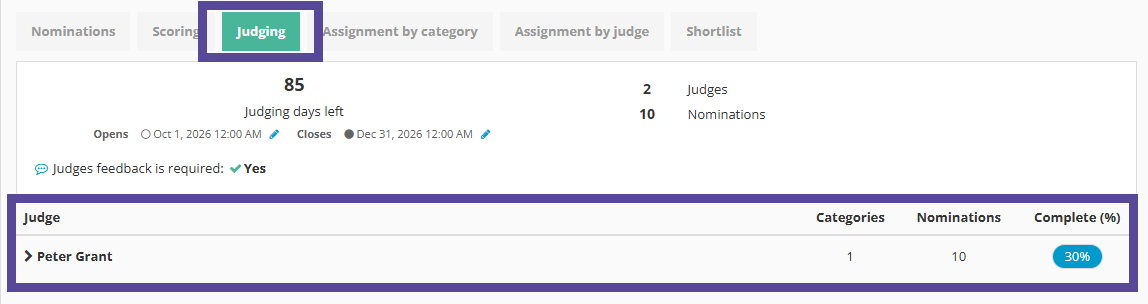
If you would like to check the judging progress in your judging round, you can navigate to Awards > Judging > Choose the round and click the Judging tab. This will display the list of judges who have been assigned to a category, with a progress bar.
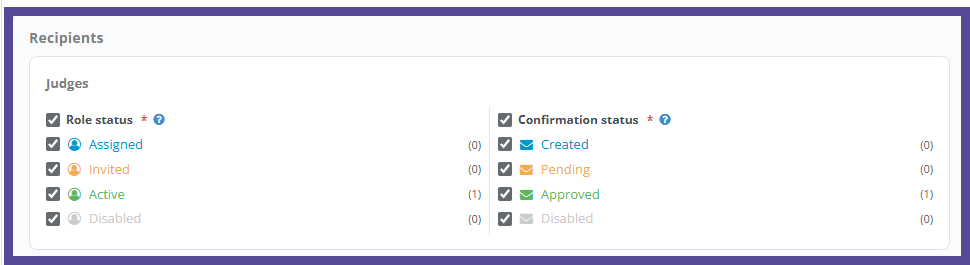
Next, choose the Recipients. In the recipients section you can choose the role status of the Judge and the confirmation status of the Judge. Tick the checkboxes of the statuses you want to use.
Judges
| Role status | Description |
| Assigned | A role has been assigned but no confirmation email was sent |
| Invited | Acceptance of a role is pending, a confirmation email has been sent |
| Active | An event role was accepted |
| Disabled | An event role is disabled |
| Confirmation status | Description |
| Created | User has been created but no confirmation email has been sent yet |
| Pending | Confirmation email has been sent, awaiting user response |
| Approved | User email has been validated |
| Disabled | User has been disabled in the system |
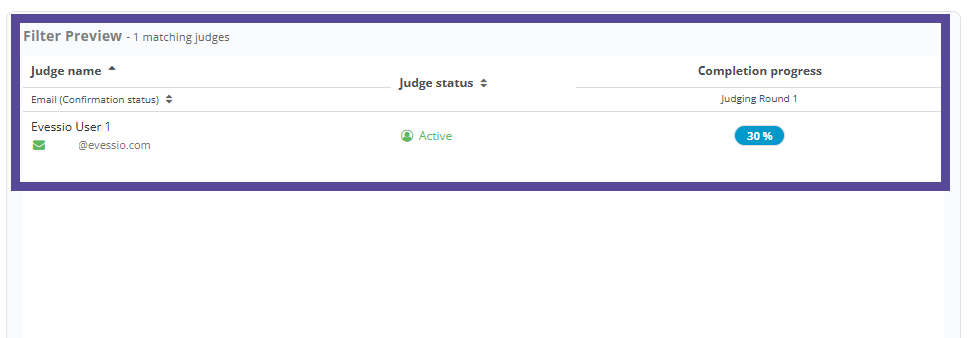
Once you have configured the required criteria the filter preview will populate with your matched recipients.
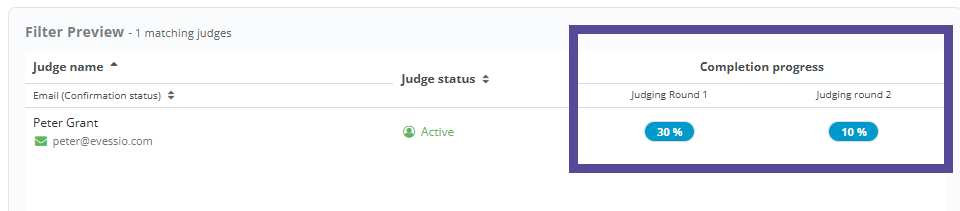
If you choose two rounds to filter judges from, the filter preview will display two Judging round columns.
Example:
Once you are happy with your criteria click Save at the bottom of the screen. It will now be stored in the filters dropdown menu where it can be used for future Mailshots.
Event Attendance Criteria
The Event Attendance criteria allows you to target recipients based on the ticket they hold, their check-in status and their account confirmation status.
To begin, you can select a product from the product menu, you can choose multiple products.
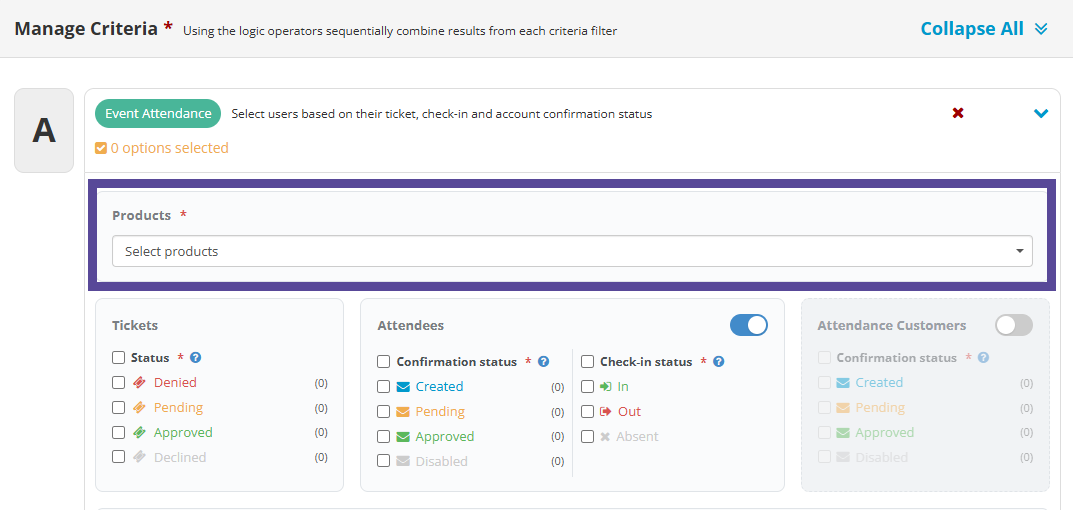
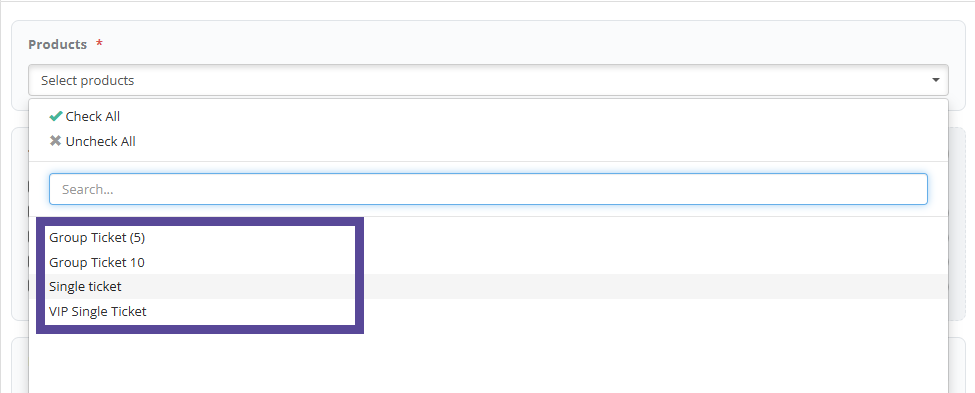
Next you have multiple status options you can use to filter;
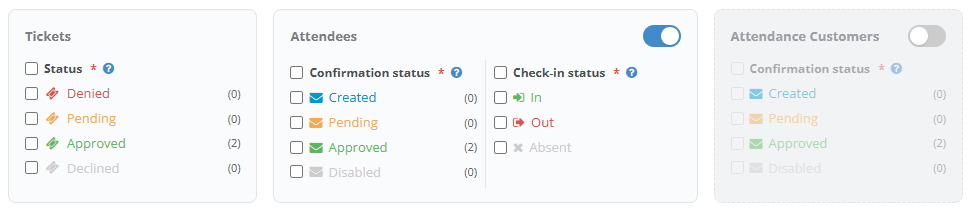
Tickets (Status) refers to your event attendance configuration. If you have ticket approval turned ON, you may want to filter the ticket status, otherwise if ticket approval is OFF then the status of your attendees tickets is most likely "Approved".
| Tickets Status | Description |
| Denied | Ticket has been denied by event admin. |
| Pending | Invitation has been sent, awaiting user response. |
| Approved | Ticket has been approved by event admin. |
| Declined | Ticket has been declined by attendee. |
Attendees Confirmation Status refers to the recipients account
| Attendees - Confirmation Status | Description |
| Created | User has been created but no confirmation email has been sent yet. |
| Pending | Confirmation email has been sent, awaiting user response. |
| Approved | User email has been validated.. |
| Disabled | User has been disabled int he system |
Attendees Check-In status refers to recipients who have been checked-in or out of the event via the Evessio Check-In App
Warning ⚠
If the check in status filter is not present, this means the Event Attendance Check-in module is off. See here how to enable the check in module
| Attendees - Check-In Status | Description |
| In | Attendee is Checked-In |
| Out | Attendee is Checked-Out |
| Absent | User has never Checked-In |
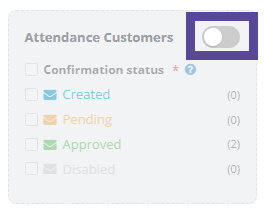
Attendance Customers refers to the person who purchased the ticket. This filter is turned OFF by default, you can activate it by toggling the switch.
The filters are the same as the Attendee Confirmation Status above.
Filter Preview
Once you select your filters you are able to see a preview mode underneath which display the results of your configuration ie the recipients who match your criteria.
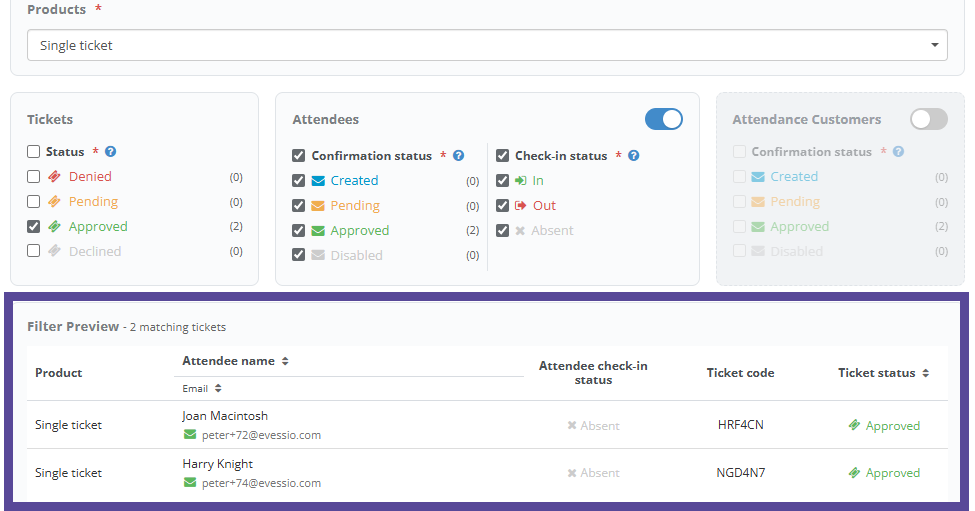
Once you are happy with your criteria click Save at the bottom of the screen. It will now be stored in the filters dropdown menu where it can be used for future Mailshots.
Order Status Criteria
Order Status criteria allows you to target recipients based on where their items are in the ordering process.
| Order Status | Description |
| In Basket | The user has an item in their basket. Baskets are used to hold product items before they are committed to a transaction. |
| Processed | A transaction has been created by the user. |
| Saved | The user has Saved their for later, removing their order from the check out flow. |
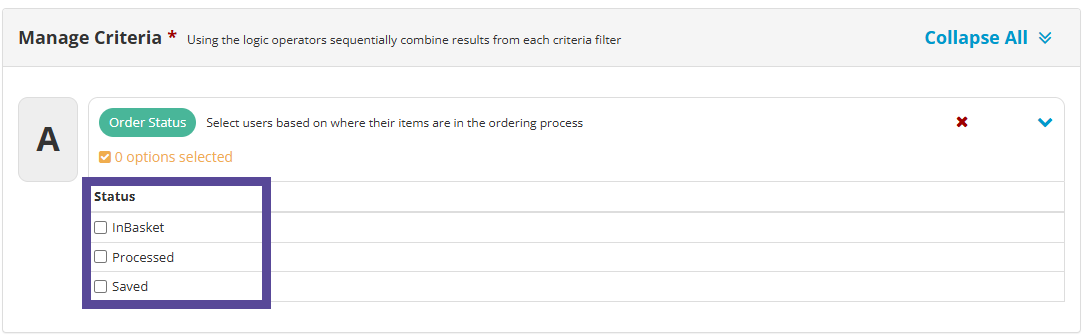
Once you are happy with your criteria click Save at the bottom of the screen. It will now be stored in the filters dropdown menu where it can be used for future Mailshots.
Transaction Status Criteria
Transaction Status criteria allows you to target users based on the status of their transaction.
You can read more on Transaction Status here in detail
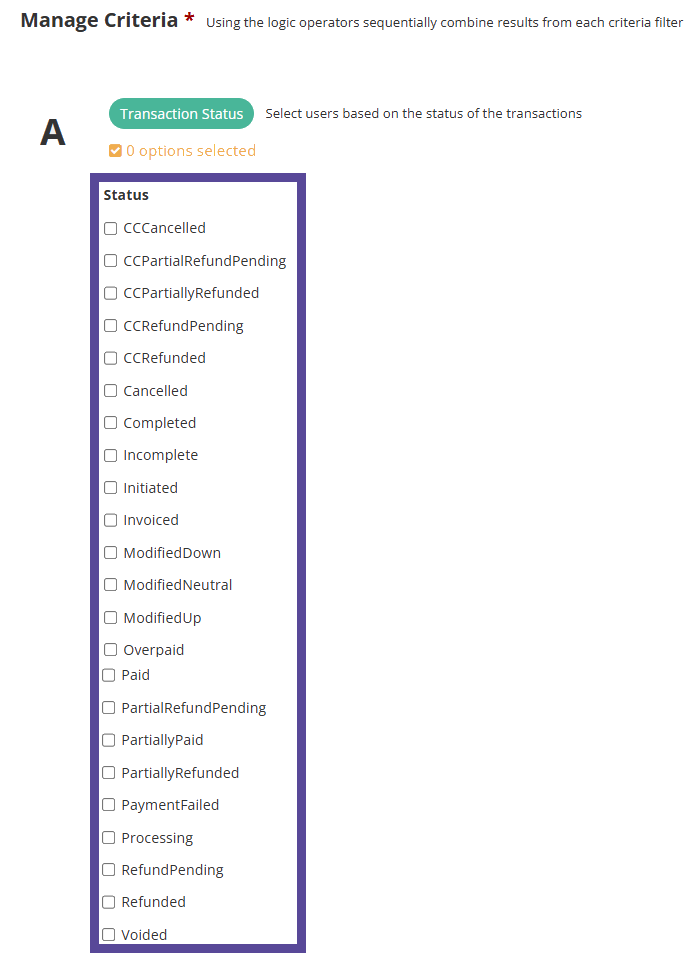
Once you are happy with your criteria click Save at the bottom of the screen. It will now be stored in the filters dropdown menu where it can be used for future Mailshots.
User Role and Status Criteria
User Role and Status criteria allows you to target recipients based on assigned roles and optionally, the status of that role.
You can read more on the Role types and what they mean here.
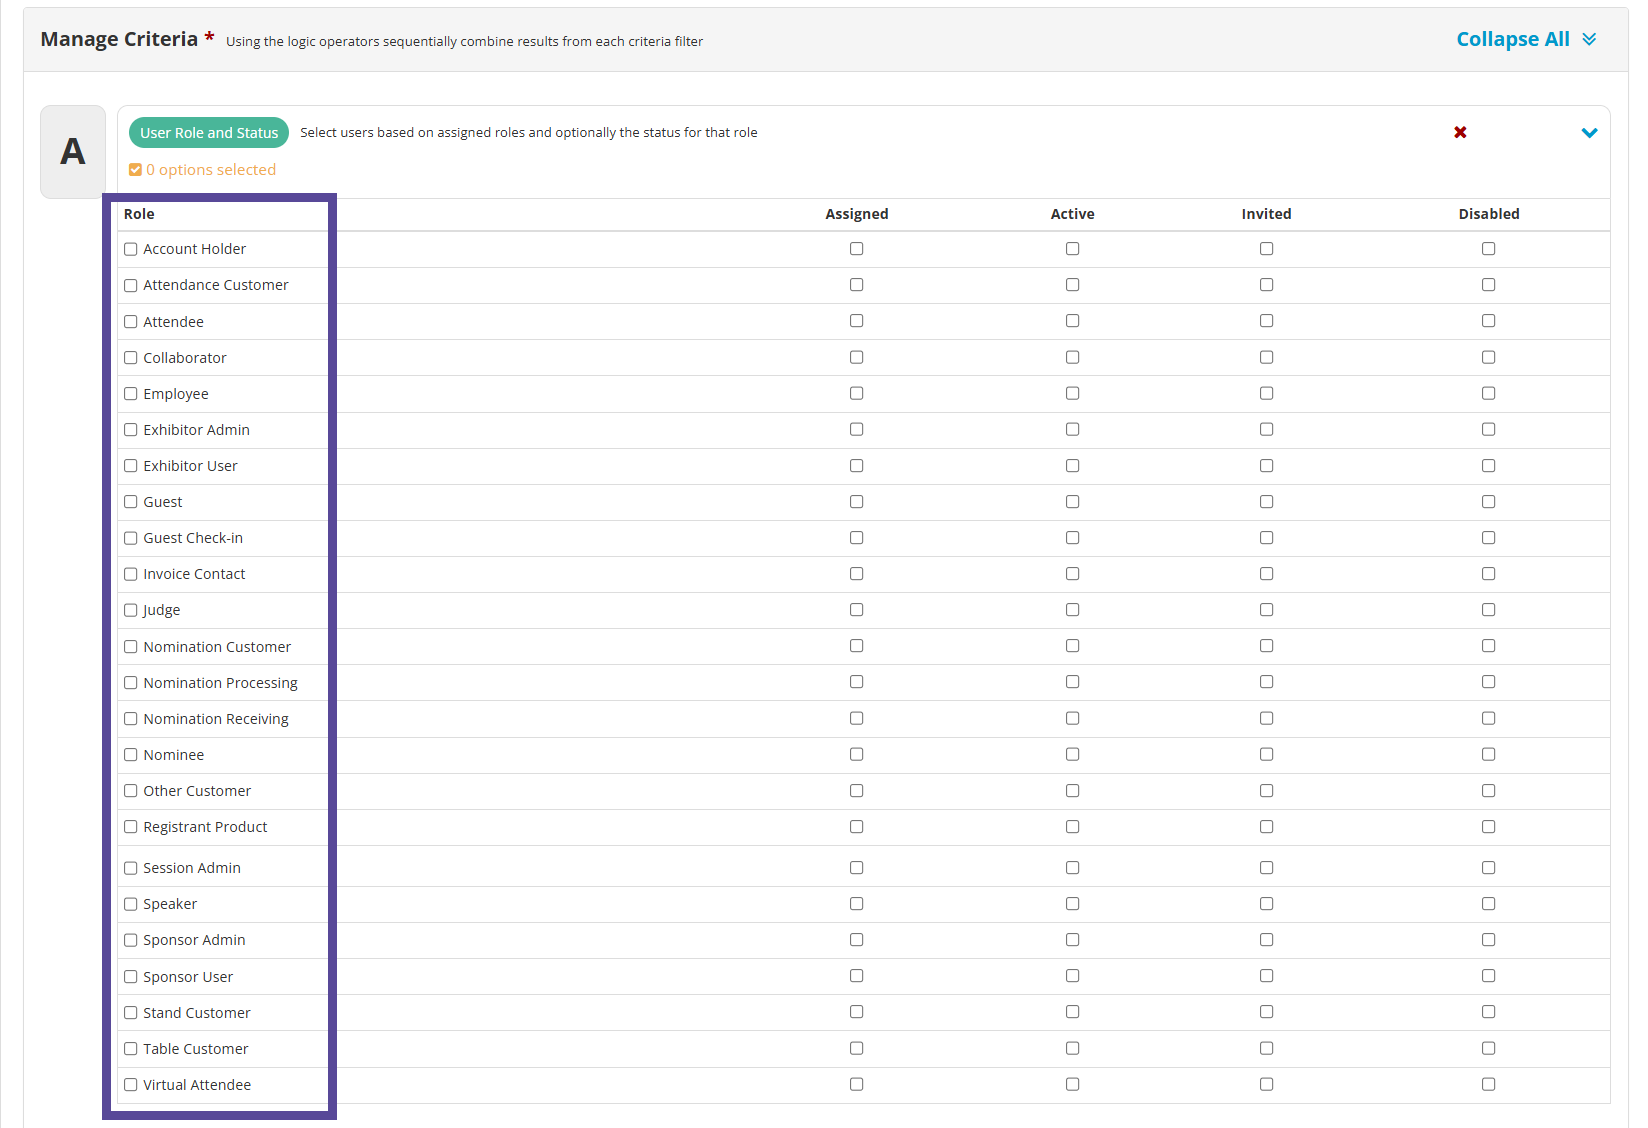
Once a Role has been chosen, you can optionally choose the role status via the columns on the right;
| Role Status | Description |
| Assigned | A role has been assigned but no confirmation email was sent |
| Active | An event role was accepted |
| Invited | Acceptance of a role is pending, a confirmation email has been sent |
| Disabled | An event role is disabled |
Once you are happy with your criteria click Save at the bottom of the screen. It will now be stored in the filters dropdown menu where it can be used for future Mailshots.
Multiple Criteria and Logic
You are able to choose multiple criteria filters and apply AND/OR/XOR/NOT logic.
For example if you choose Order Status and Transaction Status you will See your criteria options are now lettered A to B. In between you will see the Logic component.
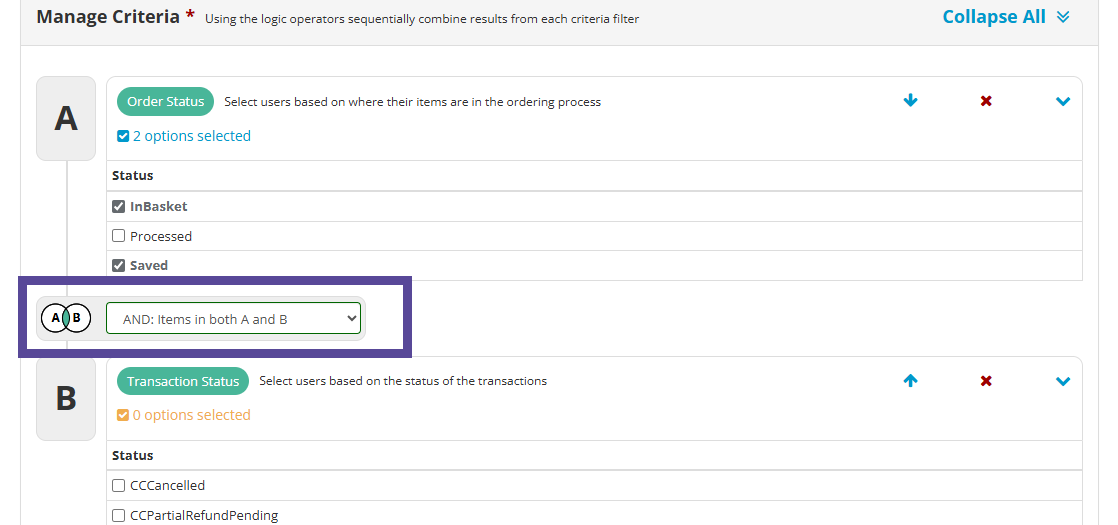
Select the drop down option to reveal the options available to you;
- AND: Items in both A and B
- OR: Items in A or B or both
- XOR: Items in A or B but not both
- NOT: Items in A but not in B
You must then insert logic to instruct how the criteria should relate to one another. You are able to change the order of the criteria click the blue navigation arrows.
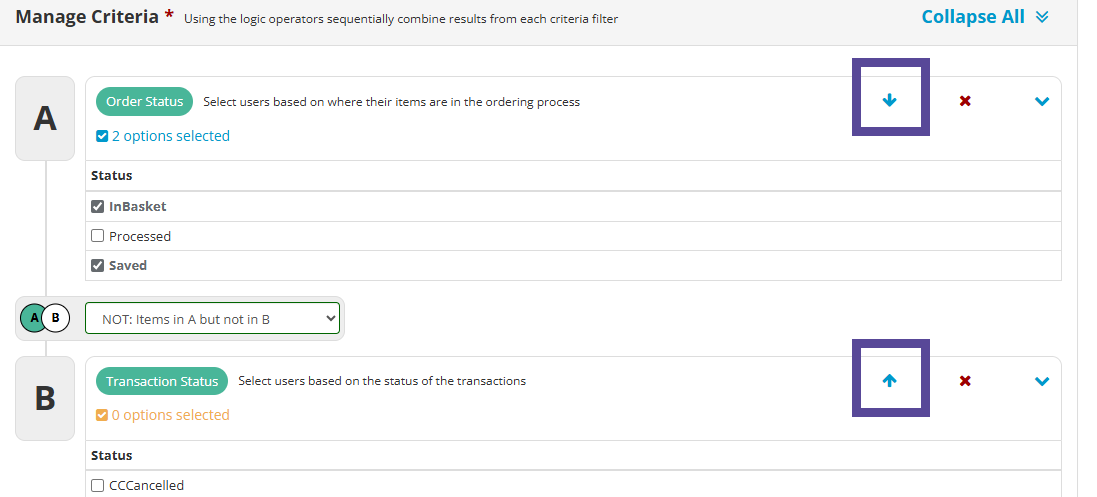
When you have selected your criteria and logic you can see how many recipients meet your criteria and will receive the mailshot via the Test button at the bottom of the screen.
Once you are happy with your criteria click Save at the bottom of the screen. It will now be stored in the filters dropdown menu where it can be used for future Mailshots.
Testing Criteria
Once you have configured your criteria you can perform a simple test by clicking the Blue test button towards the bottom of the screen.
It will display a total matched number.

If there are any issues with your configuration, you will get a message under the Test Criteria section, to guide you on the solution.

Edit Filters
If you want to edit a filter, first select the filter from the dropdown list and click Edit Filter.
Tip 💡
In the Filter by criteria dropdown list you will find System filters, filters you have previously created and also filters created on all other events in your organization.
Warning ⚠
Once custom filters have been created they will become a singular object across all events, this means if you edit another admins filter in your event then the changes made will effect the same filter being used in other events.
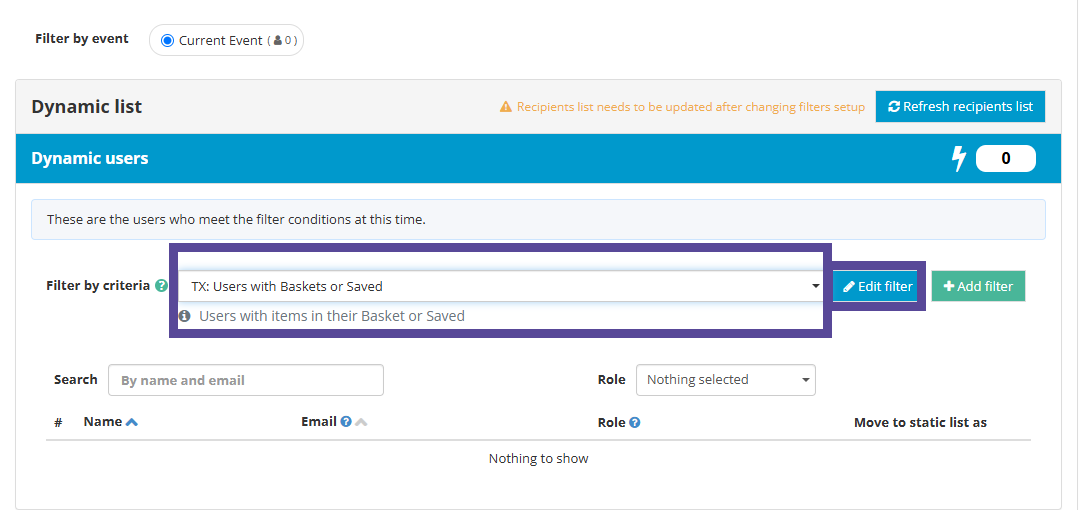
You can edit the filter directly or clone it and make your own version.
Note 🗒️
System filters need to be cloned as you will not be able to edit them directly.
You will need to scroll down and click the green Clone Filter button before you are able to edit any any of the filter configuration options.
